Table Of Contents
- Grid Layout
- Background
- Column Width and Row Height
- Using a GridLayout
GridLayoutGridLayout.col_default_widthGridLayout.col_force_defaultGridLayout.colsGridLayout.cols_minimumGridLayout.do_layout()GridLayout.minimum_heightGridLayout.minimum_sizeGridLayout.minimum_widthGridLayout.orientationGridLayout.paddingGridLayout.row_default_heightGridLayout.row_force_defaultGridLayout.rowsGridLayout.rows_minimumGridLayout.spacing
GridLayoutException
Grid Layout
Added in version 1.0.4.
The GridLayout arranges children in a matrix. It takes the available
space and divides it into columns and rows, then adds widgets to the resulting
“cells”.
Changed in version 1.0.7: The implementation has changed to use the widget size_hint for calculating column/row sizes. uniform_width and uniform_height have been removed and other properties have added to give you more control.
Background
Unlike many other toolkits, you cannot explicitly place a widget in a specific column/row. Each child is automatically assigned a position determined by the layout configuration and the child’s index in the children list.
A GridLayout must always have at least one input constraint:
GridLayout.cols or GridLayout.rows. If you do not specify cols
or rows, the Layout will throw an exception.
Column Width and Row Height
The column width/row height are determined in 3 steps:
The initial size is given by the
col_default_widthandrow_default_heightproperties. To customize the size of a single column or row, usecols_minimumorrows_minimum.The size_hint_x/size_hint_y of the children are taken into account. If no widgets have a size hint, the maximum size is used for all children.
You can force the default size by setting the
col_force_defaultorrow_force_defaultproperty. This will force the layout to ignore the width and size_hint properties of children and use the default size.
Using a GridLayout
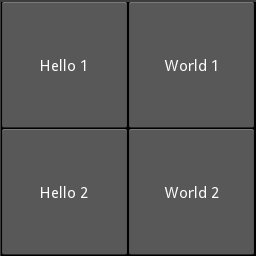
In the example below, all widgets will have an equal size. By default, the size_hint is (1, 1), so a Widget will take the full size of the parent:
layout = GridLayout(cols=2)
layout.add_widget(Button(text='Hello 1'))
layout.add_widget(Button(text='World 1'))
layout.add_widget(Button(text='Hello 2'))
layout.add_widget(Button(text='World 2'))
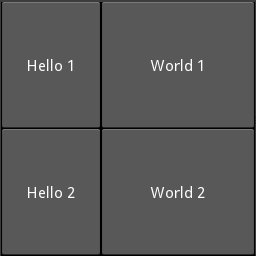
Now, let’s fix the size of Hello buttons to 100px instead of using size_hint_x=1:
layout = GridLayout(cols=2)
layout.add_widget(Button(text='Hello 1', size_hint_x=None, width=100))
layout.add_widget(Button(text='World 1'))
layout.add_widget(Button(text='Hello 2', size_hint_x=None, width=100))
layout.add_widget(Button(text='World 2'))
Next, let’s fix the row height to a specific size:
layout = GridLayout(cols=2, row_force_default=True, row_default_height=40)
layout.add_widget(Button(text='Hello 1', size_hint_x=None, width=100))
layout.add_widget(Button(text='World 1'))
layout.add_widget(Button(text='Hello 2', size_hint_x=None, width=100))
layout.add_widget(Button(text='World 2'))

- class kivy.uix.gridlayout.GridLayout(**kwargs)[source]
Bases:
LayoutGrid layout class. See module documentation for more information.
- col_default_width
Default minimum size to use for a column.
Added in version 1.0.7.
col_default_widthis aNumericPropertyand defaults to 0.
- col_force_default
If True, ignore the width and size_hint_x of the child and use the default column width.
Added in version 1.0.7.
col_force_defaultis aBooleanPropertyand defaults to False.
- cols
Number of columns in the grid.
Changed in version 1.0.8: Changed from a NumericProperty to BoundedNumericProperty. You can no longer set this to a negative value.
colsis aNumericPropertyand defaults to None.
- cols_minimum
Dict of minimum width for each column. The dictionary keys are the column numbers, e.g. 0, 1, 2…
Added in version 1.0.7.
cols_minimumis aDictPropertyand defaults to {}.
- do_layout(*largs)[source]
This function is called when a layout is called by a trigger. If you are writing a new Layout subclass, don’t call this function directly but use
_trigger_layout()instead.The function is by default called before the next frame, therefore the layout isn’t updated immediately. Anything depending on the positions of e.g. children should be scheduled for the next frame.
Added in version 1.0.8.
- minimum_height
Automatically computed minimum height needed to contain all children.
Added in version 1.0.8.
minimum_heightis aNumericPropertyand defaults to 0. It is read only.
- minimum_size
Automatically computed minimum size needed to contain all children.
Added in version 1.0.8.
minimum_sizeis aReferenceListPropertyof (minimum_width,minimum_height) properties. It is read only.
- minimum_width
Automatically computed minimum width needed to contain all children.
Added in version 1.0.8.
minimum_widthis aNumericPropertyand defaults to 0. It is read only.
- orientation
Orientation of the layout.
orientationis anOptionPropertyand defaults to ‘lr-tb’.Valid orientations are ‘lr-tb’, ‘tb-lr’, ‘rl-tb’, ‘tb-rl’, ‘lr-bt’, ‘bt-lr’, ‘rl-bt’ and ‘bt-rl’.
Added in version 2.0.0.
Note
‘lr’ means Left to Right. ‘rl’ means Right to Left. ‘tb’ means Top to Bottom. ‘bt’ means Bottom to Top.
- padding
Padding between the layout box and its children: [padding_left, padding_top, padding_right, padding_bottom].
padding also accepts a two argument form [padding_horizontal, padding_vertical] and a one argument form [padding].
Changed in version 1.7.0: Replaced NumericProperty with VariableListProperty.
paddingis aVariableListPropertyand defaults to [0, 0, 0, 0].
- row_default_height
Default minimum size to use for row.
Added in version 1.0.7.
row_default_heightis aNumericPropertyand defaults to 0.
- row_force_default
If True, ignore the height and size_hint_y of the child and use the default row height.
Added in version 1.0.7.
row_force_defaultis aBooleanPropertyand defaults to False.
- rows
Number of rows in the grid.
Changed in version 1.0.8: Changed from a NumericProperty to a BoundedNumericProperty. You can no longer set this to a negative value.
rowsis aNumericPropertyand defaults to None.
- rows_minimum
Dict of minimum height for each row. The dictionary keys are the row numbers, e.g. 0, 1, 2…
Added in version 1.0.7.
rows_minimumis aDictPropertyand defaults to {}.
- spacing
Spacing between children: [spacing_horizontal, spacing_vertical].
spacing also accepts a one argument form [spacing].
spacingis aVariableListPropertyand defaults to [0, 0].
- exception kivy.uix.gridlayout.GridLayoutException[source]
Bases:
ExceptionException for errors if the grid layout manipulation fails.