Table Of Contents
- Graphics
- The basics
- GL Reloading mechanism
ApplyContextMatrixBezierBindTextureBorderImageBoxShadowCallbackCanvasCanvasBaseChangeStateClearBuffersClearColorColorContextInstructionEllipseFboGraphicExceptionInstructionInstructionGroupLineLoadIdentityMatrixInstructionMeshPointPopMatrixPopStatePushMatrixPushStateQuadRectangleRenderContextRotateScaleSmoothEllipseSmoothLineSmoothQuadSmoothRectangleSmoothRoundedRectangleSmoothTriangleStencilPopStencilPushStencilUnUseStencilUseTranslateTriangleUpdateNormalMatrixVertexInstructiongl_init_resources()
Graphics
This package assembles many low level functions used for drawing. The whole graphics package is compatible with OpenGL ES 2.0 and has many rendering optimizations.
The basics
For drawing on a screen, you will need :
a
Canvasobject.
Instructionobjects.
Each Widget
in Kivy already has a Canvas by default. When you create
a widget, you can create all the instructions needed for drawing. If
self is your current widget, you can do:
from kivy.graphics import *
with self.canvas:
    # Add a red color
    Color(1., 0, 0)

    # Add a rectangle
    Rectangle(pos=(10, 10), size=(500, 500))
The instructions Color and Rectangle are automatically added
to the canvas object and will be used when the window is drawn.
Note
Kivy drawing instructions are not automatically relative to the position
or size of the widget. You, therefore, need to consider these factors when
drawing. In order to make your drawing instructions relative to the widget,
the instructions need either to be
declared in the KvLang or bound to pos and size changes.
Please see Adding a Background to a Layout for more detail.
GL Reloading mechanism
Added in version 1.2.0.
During the lifetime of the application, the OpenGL context might be lost. This happens:
when Android releases the app resources: when your application goes to the background, Android might reclaim your opengl context to give the resource to another app. When the user switches back to your application, a newly created gl context is given to your app.
Starting from 1.2.0, we have introduced a mechanism for reloading all the graphics resources using the GPU: Canvas, FBO, Shader, Texture, VBO, and VertexBatch:
VBO and VertexBatch are constructed by our graphics instructions. We have all the data needed to reconstruct when reloading.
Shader: same as VBO, we store the source and values used in the shader so we are able to recreate the vertex/fragment/program.
Texture: if the texture has a source (an image file or atlas), the image is reloaded from the source and reuploaded to the GPU.
You should cover these cases yourself:
Textures without a source: if you manually created a texture and manually blit data / a buffer to it, you must handle the reloading yourself. Check the Texture to learn how to manage that case. (The text rendering already generates the texture and handles the reloading. You don’t need to reload text yourself.)
FBO: if you added / removed / drew things multiple times on the FBO, we can’t reload it. We don’t keep a history of the instructions put on it. As for textures without a source, check the Framebuffer to learn how to manage that case.
- class kivy.graphics.ApplyContextMatrix(**kwargs)
Bases:
ContextInstructiontarget_stack by the matrix at the top of the ‘source_stack’
Added in version 1.6.0.
- source_stack
Name of the matrix stack to use as a source. Can be ‘modelview_mat’, ‘projection_mat’ or ‘frag_modelview_mat’.
Added in version 1.6.0.
- target_stack
Name of the matrix stack to use as a target. Can be ‘modelview_mat’, ‘projection_mat’ or ‘frag_modelview_mat’.
Added in version 1.6.0.
- class kivy.graphics.Bezier(**kwargs)
Bases:
VertexInstructionAdded in version 1.0.8.
- Parameters:
- points: list
List of points in the format (x1, y1, x2, y2…)
- segments: int, defaults to 180
Define how many segments are needed for drawing the curve. The drawing will be smoother if you have many segments.
- loop: bool, defaults to False
Set the bezier curve to join the last point to the first.
- dash_length: int
Length of a segment (if dashed), defaults to 1.
- dash_offset: int
Distance between the end of a segment and the start of the next one, defaults to 0. Changing this makes it dashed.
- dash_length
Property for getting/setting the length of the dashes in the curve.
- dash_offset
Property for getting/setting the offset between the dashes in the curve.
- points
Property for getting/settings the points of the triangle.
Warning
This will always reconstruct the whole graphic from the new points list. It can be very CPU intensive.
- segments
Property for getting/setting the number of segments of the curve.
- class kivy.graphics.BindTexture(**kwargs)
Bases:
ContextInstructionThe BindTexture Instruction will bind a texture and enable GL_TEXTURE_2D for subsequent drawing.
- Parameters:
- texture: Texture
Specifies the texture to bind to the given index.
- source
Set/get the source (filename) to load for the texture.
- class kivy.graphics.BorderImage(**kwargs)
Bases:
Rectangleconcept of a CSS3 border-image.
- Parameters:
- border: list
Border information in the format (bottom, right, top, left). Each value is in pixels.
- auto_scale: string
Added in version 1.9.1.
Changed in version 1.9.2: This used to be a bool and has been changed to be a string state.
Can be one of ‘off’, ‘both’, ‘x_only’, ‘y_only’, ‘y_full_x_lower’, ‘x_full_y_lower’, ‘both_lower’.
Autoscale controls the behavior of the 9-slice.
By default the border values are preserved exactly, meaning that if the total size of the object is smaller than the border values you will have some ‘rendering errors’ where your texture appears inside out. This also makes it impossible to achieve a rounded button that scales larger than the size of its source texture. The various options for auto_scale will let you achieve some mixes of the 2 types of rendering.
‘off’: is the default and behaves as BorderImage did when auto_scale was False before.
‘both’: Scales both x and y dimension borders according to the size of the BorderImage, this disables the BorderImage making it render the same as a regular Image.
‘x_only’: The Y dimension functions as the default, and the X scales to the size of the BorderImage’s width.
‘y_only’: The X dimension functions as the default, and the Y scales to the size of the BorderImage’s height.
‘y_full_x_lower’: Y scales as in ‘y_only’, Y scales if the size of the scaled version would be smaller than the provided border only.
‘x_full_y_lower’: X scales as in ‘x_only’, Y scales if the size of the scaled version would be smaller than the provided border only.
‘both_lower’: This is what auto_scale did when it was True in 1.9.1 Both X and Y dimensions will be scaled if the BorderImage is smaller than the source.
If the BorderImage’s size is less than the sum of its borders, horizontally or vertically, and this property is set to True, the borders will be rescaled to accommodate for the smaller size.
- auto_scale
Property for setting if the corners are automatically scaled when the BorderImage is too small.
- border
Property for getting/setting the border of the class.
- display_border
Property for getting/setting the border display size.
- class kivy.graphics.BoxShadow(*args, **kwargs)
Bases:
InstructionGroupAdded in version 2.2.0.
Changed in version 2.3.0: Fixed
Canvasmanagement usingadd(),insert()andremove(). Previously, using them to manage theCanvashad no effect.The base class also changed from
FbotoInstructionGroup.- Parameters:
- inset: bool, defaults to
False. Defines whether the shadow is drawn from the inside out or from the outline to the inside of the
BoxShadowinstruction.- size: list | tuple, defaults to
(100.0, 100.0). Define the raw size of the shadow, that is, you should not take into account changes in the value of
blur_radiusandspread_radiusproperties when setting this parameter.- pos: list | tuple, defaults to
(0.0, 0.0). Define the raw position of the shadow, that is, you should not take into account changes in the value of the
offsetproperty when setting this parameter.- offset: list | tuple, defaults to
(0.0, 0.0). Specifies shadow offsets in (horizontal, vertical) format. Positive values for the offset indicate that the shadow should move to the right and/or top. The negative ones indicate that the shadow should move to the left and/or down.
- blur_radius: float, defaults to
15.0. Define the shadow blur radius. Controls shadow expansion and softness.
- spread_radius: list | tuple, defaults to
(0.0, 0.0). Define the shrink/expansion of the shadow.
- border_radius: list | tuple, defaults to
(0.0, 0.0, 0.0, 0.0). Specifies the radii used for the rounded corners clockwise: top-left, top-right, bottom-right, bottom-left.
- optimize: bool, defaults to
True. When enabled, uses a fixed size FBO and scales it to the target size for better performance. When disabled, rebuilds the FBO to match the target size for higher quality.
- optimize_fbo_size: list | tuple, defaults to
(100.0, 100.0). Defines the fixed FBO size used when
optimizeisTrue. Larger values improve quality but increase memory and startup cost.
- inset: bool, defaults to
- blur_radius
Define the shadow blur radius. Controls shadow expansion and softness.
Defaults to
15.0.In the images below, the start and end positions of the shadow blur effect length are indicated. The transition between color and transparency is seamless, and although the shadow appears to end before before the dotted rectangle, its end is made to be as smooth as possible.
insetOFF:
insetON:
Note
In some cases (if this is not your intention), placing an element above the shadow (before the blur radius ends) will result in a unwanted cropping/overlay behavior rather than continuity, breaking the shadow’s soft ending, as shown in the image below.

- border_radius
Specifies the radii used for the rounded corners clockwise: top-left, top-right, bottom-right, bottom-left.
Defaults to
(0.0, 0.0, 0.0, 0.0).insetOFF:
insetON:
- inset
Defines whether the shadow is drawn from the inside out or from the outline to the inside of the
BoxShadowinstruction.Defaults to
False.Note
Although the inset mode determines the drawing behavior of the shadow, the position of the
BoxShadowinstruction in thecanvashierarchy depends on the other graphic instructions present in theCanvasinstruction tree.In other words, if the target is in the
canvaslayer and you want to use the defaultinset = Falsemode to create an elevation effect, you must declare theBoxShadowinstruction incanvas.beforelayer.
<MyWidget@Widget>:
    size_hint: None, None
    size: 100, 100
    pos: 100, 100

    canvas.before:
        # BoxShadow statements
        Color:
            rgba: 0, 0, 0, 0.65
        BoxShadow:
            pos: self.pos
            size: self.size
            offset: 0, -10
            blur_radius: 25
            spread_radius: -10, -10
            border_radius: 10, 10, 10, 10

    canvas:
        # target element statements
        Color:
            rgba: 1, 1, 1, 1
        Rectangle:
            pos: self.pos
            size: self.size
Or, if the target is in the
canvaslayer and you want to use theinset = Truemode to create an insertion effect, you must declare theBoxShadowinstruction in thecanvaslayer, immediately after the targetcanvasdeclaration, or declare it incanvas.after.
<MyWidget@Widget>:
    size_hint: None, None
    size: 100, 100
    pos: 100, 100

    canvas:
        # target element statements
        Color:
            rgba: 1, 1, 1, 1
        Rectangle:
            pos: self.pos
            size: self.size

        # BoxShadow statements
        Color:
            rgba: 0, 0, 0, 0.65
        BoxShadow:
            inset: True
            pos: self.pos
            size: self.size
            offset: 0, -10
            blur_radius: 25
            spread_radius: -10, -10
            border_radius: 10, 10, 10, 10
In summary:
Elevation effect -
inset = False: theBoxShadowinstruction needs to be drawn before the target element.Insertion effect -
inset = True: theBoxShadowinstruction needs to be drawn after the target element.
In general,
BoxShadowis more flexible than box-shadow (CSS) because theinset = Falseandinset = Truemodes do not limit the drawing of the shadow below and above the target element, respectively. Actually, you can define any hierarchy you want in theCanvasdeclaration tree, to create more complex effects that go beyond common shadow effects.Modes:
False(default) - The shadow is drawn inside out theBoxShadowinstruction, creating a raised effect.True- The shadow is drawn from the outline to the inside of theBoxShadowinstruction, creating a inset effect.

- offset
Specifies shadow offsets in [horizontal, vertical] format. Positive values for the offset indicate that the shadow should move to the right and/or top. The negative ones indicate that the shadow should move to the left and/or down.
Defaults to
(0.0, 0.0).For this property to work as expected, it is indicated that the value of
poscoincides with the position of the target element of the shadow, as in the example below:insetOFF:
insetON:
- optimize
Enable fixed size FBO scaling optimization.
Added in version 3.0.0.
Defaults to
True. WhenFalse, the FBO is resized to match the shadow size for higher quality at the cost of performance. WhenTrue, the shadow is generated at a fixed resolution and scaled to the target size.
- optimize_fbo_size
Fixed FBO size used when
optimizeisTrue.Added in version 3.0.0.
Defaults to
(100.0, 100.0). Larger values improve quality at the cost of memory usage and FBO creation time.
- pos
Define the raw position of the shadow, that is, you should not take into account changes in the value of the
offsetproperty when setting this property.insetON:Returns the raw position (the same as specified).
Defaults to
(0.0, 0.0).Note
It is recommended that this property matches the raw position of the shadow target element. To manipulate horizontal and vertical offset, use
offsetinstead.
- size
Define the raw size of the shadow, that is, you should not take into account changes in the value of
blur_radiusandspread_radiusproperties.insetOFF:Returns the adjusted size of the shadow according to the
blur_radiusandspread_radiusproperties.
insetON:Returns the raw size (the same as specified).
Defaults to
(100.0, 100.0).Note
It is recommended that this property matches the raw size of the shadow target element. To control the shrink/expansion of the shadow’s raw
size, usespread_radiusinstead.
- spread_radius
Define the shrink/expansion of the shadow in [horizontal, vertical] format.
Defaults to
(0.0, 0.0).This property is especially useful for cases where you want to achieve a softer shadow around the element, by setting negative values for
spread_radiusand a larger value forblur_radiusas in the example.insetOFF:In the image below, the target element has a raw size of
200 x 150px. Positive changes to thespread_radiusvalues will cause the rawsizeof the shadow to increase, while negative values will cause the shadow to shrink.
insetON:Positive values will cause the shadow to grow into the bounding box, while negative values will cause the shadow to shrink.

- class kivy.graphics.Callback(callback=None, **kwargs)
Bases:
InstructionA Callback is an instruction that will be called when the drawing operation is performed. When adding instructions to a canvas, you can do this:
with self.canvas:
    Color(1, 1, 1)
    Rectangle(pos=self.pos, size=self.size)
    Callback(self.my_callback)
The definition of the callback must be:
def my_callback(self, instr):
    print('I have been called!')
Warning
Note that if you perform many and/or costly calls to callbacks, you might potentially slow down the rendering performance significantly.
The updating of your canvas does not occur until something new happens. From your callback, you can ask for an update:
with self.canvas:
    self.cb = Callback(self.my_callback)
# then later in the code
self.cb.ask_update()
If you use the Callback class to call rendering methods of another toolkit, you will have issues with the OpenGL context. The OpenGL state may have been manipulated by the other toolkit, and as soon as program flow returns to Kivy, it will just break. You can have glitches, crashes, black holes might occur, etc. To avoid that, you can activate the
reset_contextoption. It will reset the OpenGL context state to make Kivy’s rendering correct after the call to your callback.Warning
The
reset_contextis not a full OpenGL reset. If you have issues regarding that, please contact us.- ask_update(self)
Inform the parent canvas that we’d like it to update on the next frame. This is useful when you need to trigger a redraw due to some value having changed for example.
Added in version 1.0.4.
- callback
Property for getting/setting func.
- reset_context
Set this to True if you want to reset the OpenGL context for Kivy after the callback has been called.
- class kivy.graphics.Canvas(**kwargs)
Bases:
CanvasBaseinstructions that you want to be used for drawing.
Note
The Canvas supports Python’s
withstatement and its enter & exit semantics.Usage of a canvas without the
withstatement:self.canvas.add(Color(1., 1., 0)) self.canvas.add(Rectangle(size=(50, 50)))
Usage of a canvas with Python’s
withstatement:with self.canvas: Color(1., 1., 0) Rectangle(size=(50, 50))
- add(self, Instruction c)
Append an
Instructionto our list. If the canvas contains an after group, then this instruction is inserted just before the after group, which remains last. This is different from howinsert()works, which can insert anywhere.
- after
Property for getting the ‘after’ group.
- ask_update(self)
Inform the canvas that we’d like it to update on the next frame. This is useful when you need to trigger a redraw due to some value having changed for example.
- before
Property for getting the ‘before’ group.
- clear(self)
Clears every
Instructionin the canvas, leaving it clean.
- draw(self)
Apply the instruction to our window.
- opacity
Property to get/set the opacity value of the canvas.
Added in version 1.4.1.
The opacity attribute controls the opacity of the canvas and its children. Be careful, it’s a cumulative attribute: the value is multiplied to the current global opacity and the result is applied to the current context color.
For example: if your parent has an opacity of 0.5 and a child has an opacity of 0.2, the real opacity of the child will be 0.5 * 0.2 = 0.1.
Then, the opacity is applied on the shader as:
frag_color = color * vec4(1.0, 1.0, 1.0, opacity);
- remove(self, Instruction c)
- class kivy.graphics.CanvasBase
Bases:
InstructionGroupCanvasBase provides the context manager methods for the
Canvas.
- class kivy.graphics.ChangeState(**kwargs)
Bases:
ContextInstructioncurrent render context.
Added in version 1.6.0.
- class kivy.graphics.ClearBuffers(*args, **kwargs)
Bases:
InstructionAdded in version 1.3.0.
Clear the buffers specified by the instructions buffer mask property. By default, only the coloc buffer is cleared.
- clear_color
If True, the color buffer will be cleared.
- clear_depth
If True, the depth buffer will be cleared.
- clear_stencil
If True, the stencil buffer will be cleared.
- class kivy.graphics.ClearColor(r, g, b, a, **kwargs)
Bases:
InstructionAdded in version 1.3.0.
Sets the clear color used to clear buffers with the glClear function or
ClearBuffersgraphics instructions.- a
Alpha component, between 0 and 1.
- b
Blue component, between 0 and 1.
- g
Green component, between 0 and 1.
- r
Red component, between 0 and 1.
- rgb
RGB color, a list of 3 values in 0-1 range where alpha will be 1.
- rgba
RGBA color used for the clear color, a list of 4 values in the 0-1 range.
- class kivy.graphics.Color(*args, **kwargs)
Bases:
ContextInstructiondrawn after it.
This represents a color between 0 and 1, but is applied as a multiplier to the texture of any vertex instructions following it in a canvas. If no texture is set, the vertex instruction takes the precise color of the Color instruction.
For instance, if a Rectangle has a texture with uniform color
(0.5, 0.5, 0.5, 1.0)and the preceding Color hasrgba=(1, 0.5, 2, 1), the actual visible color will be(0.5, 0.25, 1.0, 1.0)since the Color instruction is applied as a multiplier to every rgba component. In this case, a Color component outside the 0-1 range gives a visible result as the intensity of the blue component is doubled.To declare a Color in Python, you can do:
from kivy.graphics import Color

# create red v
c = Color(1, 0, 0)
# create blue color
c = Color(0, 1, 0)
# create blue color with 50% alpha
c = Color(0, 1, 0, .5)

# using hsv mode
c = Color(0, 1, 1, mode='hsv')
# using hsv mode + alpha
c = Color(0, 1, 1, .2, mode='hsv')
You can also set color components that are available as properties by passing them as keyword arguments:
c = Color(b=0.5) # sets the blue component only
In kv lang you can set the color properties directly:
<Rule>:
    canvas:
        # red color
        Color:
            rgb: 1, 0, 0
        # blue color
        Color:
            rgb: 0, 1, 0
        # blue color with 50% alpha
        Color:
            rgba: 0, 1, 0, .5

        # using hsv mode
        Color:
            hsv: 0, 1, 1
        # using hsv mode + alpha
        Color:
            hsv: 0, 1, 1
            a: .5
- a
Alpha component, between 0 and 1.
- b
Blue component, between 0 and 1.
- g
Green component, between 0 and 1.
- h
Hue component, between 0 and 1.
- hsv
HSV color, list of 3 values in 0-1 range, alpha will be 1.
- r
Red component, between 0 and 1.
- rgb
RGB color, list of 3 values in 0-1 range. The alpha will be 1.
- rgba
RGBA color, list of 4 values in 0-1 range.
- s
Saturation component, between 0 and 1.
- v
Value component, between 0 and 1.
- class kivy.graphics.ContextInstruction(**kwargs)
Bases:
Instructionthat don’t have a direct visual representation, but instead modify the current Canvas’ state, e.g. texture binding, setting color parameters, matrix manipulation and so on.
- class kivy.graphics.Ellipse(*args, **kwargs)
Bases:
Rectangle- Parameters:
- segments: int, the default value is calculated from the range between angle.
Define how many segments are needed for drawing the ellipse. The ellipse drawing will be smoother if you have many segments, however you can also use this property to create polygons with 3 or more sides.
- angle_start: float, defaults to 0.0
Specifies the starting angle, in degrees, of the disk portion.
- angle_end: float, defaults to 360.0
Specifies the ending angle, in degrees, of the disk portion.
Changed in version 1.0.7: Added angle_start and angle_end.
Changed in version 2.2.0: The default number of segments is no longer 180, it is now calculated according to the angle range, as this is a more efficient approach.
- angle_end
End angle of the ellipse in degrees, defaults to 360.
- angle_start
Start angle of the ellipse in degrees, defaults to 0.
- segments
Property for getting/setting the number of segments of the ellipse. The ellipse drawing will be smoother if you have many segments, however you can also use this property to create polygons with 3 or more sides. Values smaller than 3 will not be represented and the number of segments will be automatically calculated.
Changed in version 2.2.0: The minimum number of segments allowed is 3. Smaller values will be ignored and the number of segments will be automatically calculated.
- class kivy.graphics.Fbo(*args, **kwargs)
Bases:
RenderContext“with” statement.
- Parameters:
- clear_color: tuple, defaults to (0, 0, 0, 0)
Define the default color for clearing the framebuffer
- size: tuple, defaults to (1024, 1024)
Default size of the framebuffer
- push_viewport: bool, defaults to True
If True, the OpenGL viewport will be set to the framebuffer size, and will be automatically restored when the framebuffer released.
- with_depthbuffer: bool, defaults to False
If True, the framebuffer will be allocated with a Z buffer.
- with_stencilbuffer: bool, defaults to False
Added in version 1.9.0.
If True, the framebuffer will be allocated with a stencil buffer.
- texture:
Texture, defaults to None If None, a default texture will be created.
Note
Using both of
with_stencilbufferandwith_depthbufferis not supported in kivy 1.9.0- add_reload_observer(self, callback)
Add a callback to be called after the whole graphics context has been reloaded. This is where you can reupload your custom data in GPU.
Added in version 1.2.0.
- Parameters:
- callback: func(context) -> return None
The first parameter will be the context itself
- bind(self)
Bind the FBO to the current opengl context. Bind mean that you enable the Framebuffer, and all the drawing operations will act inside the Framebuffer, until
release()is called.The bind/release operations are automatically called when you add graphics objects into it. If you want to manipulate a Framebuffer yourself, you can use it like this:
self.fbo = FBO()
self.fbo.bind()
# do any drawing command
self.fbo.release()

# then, your fbo texture is available at
print(self.fbo.texture)
- clear_buffer(self)
Clear the framebuffer with the
clear_color.You need to bind the framebuffer yourself before calling this method:
fbo.bind()
fbo.clear_buffer()
fbo.release()
- clear_color
Clear color in (red, green, blue, alpha) format.
- get_pixel_color(self, int wx, int wy)
Get the color of the pixel with specified window coordinates wx, wy. It returns result in RGBA format.
Added in version 1.8.0.
- pixels
Get the pixels texture, in RGBA format only, unsigned byte. The origin of the image is at bottom left.
Added in version 1.7.0.
- release(self)
Release the Framebuffer (unbind).
- remove_reload_observer(self, callback)
Remove a callback from the observer list, previously added by
add_reload_observer().Added in version 1.2.0.
- size
Size of the framebuffer, in (width, height) format.
If you change the size, the framebuffer content will be lost.
- texture
Return the framebuffer texture
- exception kivy.graphics.GraphicException
Bases:
ExceptionException raised when a graphics error is fired.
- class kivy.graphics.Instruction(**kwargs)
Bases:
ObjectWithUidusage only, don’t use it directly.
- flag_data_update(self)
- flag_update(self, int do_parent=1)
- group
group: str
- proxy_ref
Return a proxy reference to the Instruction i.e. without creating a reference of the widget. See weakref.proxy for more information.
Added in version 1.7.2.
- class kivy.graphics.InstructionGroup(**kwargs)
Bases:
Instructionof graphics instructions. It can be used directly as follows:
blue = InstructionGroup() blue.add(Color(0, 0, 1, 0.2)) blue.add(Rectangle(pos=self.pos, size=(100, 100)))
green = InstructionGroup() green.add(Color(0, 1, 0, 0.4)) green.add(Rectangle(pos=(100, 100), size=(100, 100)))
# Here, self should be a Widget or subclass [self.canvas.add(group) for group in [blue, green]]
- add(self, Instruction c)
Add a new
Instructionto our list.
- children
children: list
- clear(self)
Remove all the
Instructions.
- get_group(self, str groupname)
Return an iterable for all the
Instructionswith a specific group name.
- indexof(self, Instruction c)
- insert(self, int index, Instruction c)
Insert a new
Instructioninto our list at index.
- length(self)
- remove(self, Instruction c)
Remove an existing
Instructionfrom our list.
- remove_group(self, str groupname)
Remove all
Instructionswith a specific group name.
- class kivy.graphics.Line(**kwargs)
Bases:
VertexInstructionDrawing a line can be done easily:
with self.canvas:
    Line(points=[100, 100, 200, 100, 100, 200], width=10)
The line has 3 internal drawing modes that you should be aware of for optimal results:
If the
widthis 1.0 andforce_custom_drawing_methodis False, then the standard GL_LINE drawing from OpenGL will be used.dash_length,dash_offset, anddasheswill work, while properties for cap and joint have no meaning here.If the
widthis greater than 1.0 orforce_custom_drawing_methodis True, then a custom drawing method, based on triangulation, will be used.dash_length,dash_offset, anddashesdo not work in this mode. Additionally, if the current color has an alpha less than 1.0, a stencil will be used internally to draw the line.
- Parameters:
- points: list
List of points in the format (x1, y1, x2, y2…)
- dash_length: int
Length of a segment (if dashed), defaults to 1.
- dash_offset: int
Offset between the end of a segment and the beginning of the next one, defaults to 0. Changing this makes it dashed.
- dashes: list of ints
List of [ON length, offset, ON length, offset, …]. E.g.
[2,4,1,6,8,2]would create a line with the first dash length 2 then an offset of 4 then a dash length of 1 then an offset of 6 and so on. Defaults to[]. Changing this makes it dashed and overrides dash_length and dash_offset.- width: float
Width of the line, defaults to 1.0.
- cap: str, defaults to ‘round’
See
capfor more information.- joint: str, defaults to ‘round’
See
jointfor more information.- cap_precision: int, defaults to 10
See
cap_precisionfor more information- joint_precision: int, defaults to 10
See
joint_precisionfor more information Seecap_precisionfor more information.- joint_precision: int, defaults to 10
See
joint_precisionfor more information.- close: bool, defaults to False
If True, the line will be closed.
- circle: list
If set, the
pointswill be set to build a circle. Seecirclefor more information.- ellipse: list
If set, the
pointswill be set to build an ellipse. Seeellipsefor more information.- rectangle: list
If set, the
pointswill be set to build a rectangle. Seerectanglefor more information.- bezier: list
If set, the
pointswill be set to build a bezier line. Seebezierfor more information.- bezier_precision: int, defaults to 180
Precision of the Bezier drawing.
- force_custom_drawing_method: bool, defaults to False
Should the custom drawing method be used, instead of it depending on
widthbeing equal to 1.o or not.
Changed in version 1.0.8: dash_offset and dash_length have been added.
Changed in version 1.4.1: width, cap, joint, cap_precision, joint_precision, close, ellipse, rectangle have been added.
Changed in version 1.4.1: bezier, bezier_precision have been added.
Changed in version 1.11.0: dashes have been added
Changed in version 2.3.0: force_custom_drawing_method has been added
- bezier
Use this property to build a bezier line, without calculating the
points. You can only set this property, not get it.The argument must be a tuple of 2n elements, n being the number of points.
Usage:
Line(bezier=(x1, y1, x2, y2, x3, y3)
Added in version 1.4.2.
Note
Bezier lines calculations are inexpensive for a low number of points, but complexity is quadratic, so lines with a lot of points can be very expensive to build, use with care!
- bezier_precision
Number of iteration for drawing the bezier between 2 segments, defaults to 180. The bezier_precision must be at least 1.
Added in version 1.4.2.
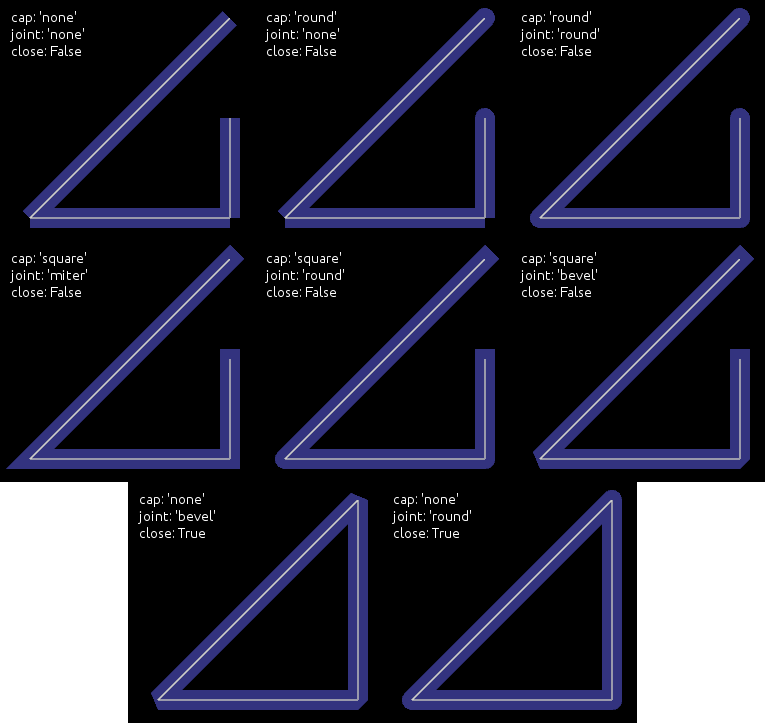
- cap
Determine the cap of the line, defaults to ‘round’. Can be one of ‘none’, ‘square’ or ‘round’
Added in version 1.4.1.
- cap_precision
Number of iteration for drawing the “round” cap, defaults to 10. The cap_precision must be at least 1.
Added in version 1.4.1.
- circle
Use this property to build a circle, without calculating the
points.The argument must be a tuple of (center_x, center_y, radius, angle_start, angle_end, segments):
center_x and center_y represent the center of the circle
radius represent the radius of the circle
(optional) angle_start and angle_end are in degree. The default value is 0 and 360.
(optional) segments is the precision of the ellipse. The default value is calculated from the range between angle.
Note that it’s up to you to
closethe circle or not.For example, for building a simple ellipse, in python:
# simple circle
Line(circle=(150, 150, 50))

# only from 90 to 180 degrees
Line(circle=(150, 150, 50, 90, 180))

# only from 90 to 180 degrees, with few segments
Line(circle=(150, 150, 50, 90, 180, 20))
Added in version 1.4.1.
Changed in version 2.2.0: Now you can get the circle generated through the property.
- close
If True, the line will be closed by joining the two ends, according to
close_mode.Added in version 1.4.1.
- close_mode
Defines how the ends of the line will be connected. Defaults to
"straight-line".Note
Support for the different closing modes depends on drawing shapes.
Available modes:
"straight-line"(all drawing shapes): the ends will be closed by a straight line."center-connected"(ellipsespecific): the ends will be closed by a line passing through the center of the ellipse.
Added in version 2.2.0.
- dash_length
Property for getting/setting the length of the dashes in the curve
Added in version 1.0.8.
- dash_offset
Property for getting/setting the offset between the dashes in the curve
Added in version 1.0.8.
- dashes
Property for getting/setting
dashes.List of [ON length, offset, ON length, offset, …]. E.g.
[2,4,1,6,8,2]would create a line with the first dash length 2 then an offset of 4 then a dash length of 1 then an offset of 6 and so on.Added in version 1.11.0.
- ellipse
Use this property to build an ellipse, without calculating the
points.The argument must be a tuple of (x, y, width, height, angle_start, angle_end, segments):
x and y represent the bottom left of the ellipse
width and height represent the size of the ellipse
(optional) angle_start and angle_end are in degree. The default value is 0 and 360.
(optional) segments is the precision of the ellipse. The default value is calculated from the range between angle. You can use this property to create polygons with 3 or more sides. Values smaller than 3 will not be represented and the number of segments will be automatically calculated.
Note that it’s up to you to
closeor not. If you choose to close, useclose_modeto define how the figure will be closed. Whether it will be by closed by a"straight-line"or by"center-connected".For example, for building a simple ellipse, in python:
# simple ellipse
Line(ellipse=(0, 0, 150, 150))

# only from 90 to 180 degrees
Line(ellipse=(0, 0, 150, 150, 90, 180))

# only from 90 to 180 degrees, with few segments
Line(ellipse=(0, 0, 150, 150, 90, 180, 20))
Added in version 1.4.1.
Changed in version 2.2.0: Now you can get the ellipse generated through the property.
The minimum number of segments allowed is 3. Smaller values will be ignored and the number of segments will be automatically calculated.
- force_custom_drawing_method
If True, the line will be drawn using the custom drawing method, no matter what the width is.
Added in version 2.3.0.
- joint
Determine the join of the line, defaults to ‘round’. Can be one of ‘none’, ‘round’, ‘bevel’, ‘miter’.
Added in version 1.4.1.
- joint_precision
Number of iteration for drawing the “round” joint, defaults to 10. The joint_precision must be at least 1.
Added in version 1.4.1.
- points
Property for getting/settings points of the line
Warning
This will always reconstruct the whole graphics from the new points list. It can be very CPU expensive.
- rectangle
Use this property to build a rectangle, without calculating the
points.The argument must be a tuple of (x, y, width, height):
x and y represent the bottom-left position of the rectangle
width and height represent the size
The line is automatically closed.
Usage:
Line(rectangle=(0, 0, 200, 200))
Added in version 1.4.1.
Changed in version 2.2.0: Now you can get the rectangle generated through the property.
- rounded_rectangle
Use this property to build a rectangle, without calculating the
points.The argument must be a tuple of one of the following forms:
(x, y, width, height, corner_radius)
(x, y, width, height, corner_radius, resolution)
(x, y, width, height, corner_radius1, corner_radius2, corner_radius3, corner_radius4)
(x, y, width, height, corner_radius1, corner_radius2, corner_radius3, corner_radius4, resolution)
x and y represent the bottom-left position of the rectangle.
width and height represent the size.
corner_radius specifies the radius used for the rounded corners clockwise: top-left, top-right, bottom-right, bottom-left.
resolution is the number of line segment that will be used to draw the circle arc at each corner (defaults to 45).
The line is automatically closed.
Usage:
Line(rounded_rectangle=(0, 0, 200, 200, 10, 20, 30, 40, 100))
Added in version 1.9.0.
Changed in version 2.2.0: Default value of resolution changed from 30 to 45.
Now you can get the rounded rectangle generated through the property.
The order of corner_radius has been changed to match the RoundedRectangle radius property (clockwise). It was bottom-left, bottom-right, top-right, top-left in previous versions. Now both are clockwise: top-left, top-right, bottom-right, bottom-left. To keep the corner radius order without changing the order manually, you can use python’s built-in method reversed or [::-1], to reverse the order of the corner radius.
- width
Determine the width of the line, defaults to 1.0.
Added in version 1.4.1.
- class kivy.graphics.LoadIdentity(**kwargs)
Bases:
ContextInstructionthe instructions stack property (default=’modelview_mat’)
Added in version 1.6.0.
- stack
Name of the matrix stack to use. Can be ‘modelview_mat’, ‘projection_mat’ or ‘frag_modelview_mat’.
- class kivy.graphics.MatrixInstruction(*args, **kwargs)
Bases:
ContextInstruction- matrix
Matrix property. Matrix from the transformation module. Setting the matrix using this property when a change is made is important because it will notify the context about the update.
- stack
Name of the matrix stack to use. Can be ‘modelview_mat’, ‘projection_mat’ or ‘frag_modelview_mat’.
Added in version 1.6.0.
- class kivy.graphics.Mesh(**kwargs)
Bases:
VertexInstructionIn OpenGL ES 2.0 and in our graphics implementation, you cannot have more than 65535 indices.
A list of vertices is described as:
vertices = [x1, y1, u1, v1, x2, y2, u2, v2, ...]
            |            |  |            |
            +---- i1 ----+  +---- i2 ----+
If you want to draw a triangle, add 3 vertices. You can then make an indices list as follows:
indices = [0, 1, 2]
Added in version 1.1.0.
- Parameters:
- vertices: iterable
List of vertices in the format (x1, y1, u1, v1, x2, y2, u2, v2…).
- indices: iterable
List of indices in the format (i1, i2, i3…).
- mode: str
Mode of the vbo. Check
modefor more information. Defaults to ‘points’.- fmt: list
The format for vertices, by default, each vertex is described by 2D coordinates (x, y) and 2D texture coordinate (u, v). Each element of the list should be a tuple or list, of the form
(variable_name, size, type)
which will allow mapping vertex data to the glsl instructions.
[(b’v_pos’, 2, ‘float’), (b’v_tc’, 2, ‘float’),]
will allow using
attribute vec2 v_pos; attribute vec2 v_tc;
in glsl’s vertex shader.
Changed in version 1.8.1: Before, vertices and indices would always be converted to a list, now, they are only converted to a list if they do not implement the buffer interface. So e.g. numpy arrays, python arrays etc. are used in place, without creating any additional copies. However, the buffers cannot be readonly (even though they are not changed, due to a cython limitation) and must be contiguous in memory.
Note
When passing a memoryview or a instance that implements the buffer interface, vertices should be a buffer of floats (‘f’ code in python array) and indices should be a buffer of unsigned short (‘H’ code in python array). Arrays in other formats will still have to be converted internally, negating any potential gain.
- indices
Vertex indices used to specify the order when drawing the mesh.
- mode
VBO Mode used for drawing vertices/indices. Can be one of ‘points’, ‘line_strip’, ‘line_loop’, ‘lines’, ‘triangles’, ‘triangle_strip’ or ‘triangle_fan’.
- vertices
List of x, y, u, v coordinates used to construct the Mesh. Right now, the Mesh instruction doesn’t allow you to change the format of the vertices, which means it’s only x, y + one texture coordinate.
- class kivy.graphics.Point(**kwargs)
Bases:
VertexInstructionwidth/height of 2 times the
pointsize.- Parameters:
- points: list
List of points in the format (x1, y1, x2, y2…), where each pair of coordinates specifies the center of a new point.
- pointsize: float, defaults to 1.
The size of the point, measured from the center to the edge. A value of 1.0 therefore means the real size will be 2.0 x 2.0.
Warning
Starting from version 1.0.7, vertex instruction have a limit of 65535 vertices (indices of vertex to be accurate). 2 entries in the list (x, y) will be converted to 4 vertices. So the limit inside Point() class is 2^15-2.
- add_point(self, float x, float y)
Add a point to the current
pointslist.If you intend to add multiple points, prefer to use this method instead of reassigning a new
pointslist. Assigning a newpointslist will recalculate and reupload the whole buffer into the GPU. If you use add_point, it will only upload the changes.
- points
Property for getting/settings the center points in the points list. Each pair of coordinates specifies the center of a new point.
- pointsize
Property for getting/setting point size. The size is measured from the center to the edge, so a value of 1.0 means the real size will be 2.0 x 2.0.
- class kivy.graphics.PopMatrix(*args, **kwargs)
Bases:
ContextInstruction- stack
Name of the matrix stack to use. Can be ‘modelview_mat’, ‘projection_mat’ or ‘frag_modelview_mat’.
Added in version 1.6.0.
- class kivy.graphics.PopState(*args, **kwargs)
Bases:
ContextInstructionstate stack.
Added in version 1.6.0.
- class kivy.graphics.PushMatrix(*args, **kwargs)
Bases:
ContextInstruction- stack
Name of the matrix stack to use. Can be ‘modelview_mat’, ‘projection_mat’ or ‘frag_modelview_mat’.
Added in version 1.6.0.
- class kivy.graphics.PushState(*args, **kwargs)
Bases:
ContextInstructionstate stack.
Added in version 1.6.0.
- class kivy.graphics.Quad(**kwargs)
Bases:
VertexInstruction- Parameters:
- points: list
List of point in the format (x1, y1, x2, y2, x3, y3, x4, y4).
- points
Property for getting/settings points of the quad.
- class kivy.graphics.Rectangle(**kwargs)
Bases:
VertexInstruction- Parameters:
- pos: list
Position of the rectangle, in the format (x, y).
- size: list
Size of the rectangle, in the format (width, height).
- points
Property for getting the points used to draw the vertices.
Added in version 2.3.0.
- pos
Property for getting/settings the position of the rectangle.
- size
Property for getting/settings the size of the rectangle.
- class kivy.graphics.RenderContext(*args, **kwargs)
Bases:
CanvasThe vertex shader
The fragment shader
The default texture
The state stack (color, texture, matrix…)
- set_texture(self, int index, Texture texture) void
- shader
Return the shader attached to the render context.
- use_parent_frag_modelview
If True, the parent fragment modelview matrix will be used.
Added in version 1.10.1: rc = RenderContext(use_parent_frag_modelview=True)
- use_parent_modelview
If True, the parent modelview matrix will be used.
Added in version 1.7.0.
Before:
rc['modelview_mat'] = Window.render_context['modelview_mat']
Now:
rc = RenderContext(use_parent_modelview=True)
- use_parent_projection
If True, the parent projection matrix will be used.
Added in version 1.7.0.
Before:
rc['projection_mat'] = Window.render_context['projection_mat']
Now:
rc = RenderContext(use_parent_projection=True)
- class kivy.graphics.Rotate(*args, **kwargs)
Bases:
Transformon the modelview matrix. You can set the properties of the instructions afterwards with e.g.
rot.angle = 90
rot.axis = (0, 0, 1)
- angle
Property for getting/setting the angle of the rotation.
- axis
Property for getting/setting the axis of the rotation.
The format of the axis is (x, y, z).
- origin
Origin of the rotation.
Added in version 1.7.0.
The format of the origin can be either (x, y) or (x, y, z).
- class kivy.graphics.Scale(*args, **kwargs)
Bases:
TransformCreate using three arguments:
Scale(x, y, z) # scale the axes independently
Changed in version 2.3.0: Allowed kwargs to be used to supply x, y and z. Removed depreciated Scale(s) in favour of Scale(x, y, z).
- origin
Origin of the scale.
Added in version 1.9.0.
The format of the origin can be either (x, y) or (x, y, z).
- x
Property for getting/setting the scale on the X axis.
Changed in version 1.6.0.
- xyz
3 tuple scale vector in 3D in x, y, and z axis.
Changed in version 1.6.0.
- y
Property for getting/setting the scale on the Y axis.
Changed in version 1.6.0.
- z
Property for getting/setting the scale on Z axis.
Changed in version 1.6.0.
- class kivy.graphics.SmoothEllipse(**kwargs)
Bases:
EllipseIts usage is the same as
EllipseNote
There is still no support for texture antialiasing. Therefore, if a texture is defined using either
textureorsource, antialiasing will be disabled.Added in version 2.3.0.
- default_texture
default_texture: kivy.graphics.texture.Texture
- class kivy.graphics.SmoothLine(**kwargs)
Bases:
Lineresults. It has few drawbacks:
drawing a line with alpha will probably not have the intended result if the line crosses itself.
it uses a custom texture with a premultiplied alpha.
lines under 1px in width are not supported: they will look the same.
Warning
This is an unfinished work, experimental, and subject to crashes.
Added in version 1.9.0.
- overdraw_width
Determine the overdraw width of the line, defaults to 1.2.
- premultiplied_texture(self)
- class kivy.graphics.SmoothQuad(**kwargs)
Bases:
QuadIts usage is the same as
QuadNote
There is still no support for texture antialiasing. Therefore, if a texture is defined using either
textureorsource, antialiasing will be disabled.Added in version 2.3.0.
- default_texture
default_texture: kivy.graphics.texture.Texture
- class kivy.graphics.SmoothRectangle(**kwargs)
Bases:
RectangleIts usage is the same as
RectangleNote
There is still no support for texture antialiasing. Therefore, if a texture is defined using either
textureorsource, antialiasing will be disabled.Added in version 2.3.0.
- default_texture
default_texture: kivy.graphics.texture.Texture
- class kivy.graphics.SmoothRoundedRectangle(**kwargs)
Bases:
RoundedRectangleIts usage is the same as
RoundedRectangleNote
There is still no support for texture antialiasing. Therefore, if a texture is defined using either
textureorsource, antialiasing will be disabled.Added in version 2.3.0.
- default_texture
default_texture: kivy.graphics.texture.Texture
- class kivy.graphics.SmoothTriangle(**kwargs)
Bases:
TriangleIts usage is the same as
TriangleNote
There is still no support for texture antialiasing. Therefore, if a texture is defined using either
textureorsource, antialiasing will be disabled.Added in version 2.3.0.
- default_texture
default_texture: kivy.graphics.texture.Texture
- class kivy.graphics.StencilPop
Bases:
InstructionPop the stencil stack. See the module documentation for more information.
- class kivy.graphics.StencilPush(**kwargs)
Bases:
Instructioninformation.
- clear_stencil
clear_stencilallow to disable stencil clearing in theStencilPushphase. This option essentially disables the invocation of the functionscgl.glClearStencil(0)andcgl.glClear(GL_STENCIL_BUFFER_BIT).If
True, the stencil will be cleaned in theStencilPushphase, ifFalse, it will not be cleaned.Note
It is highly recommended to set
clear_stencil=Falsefor improved performance and reduced GPU usage (especially if there are hundreds of instructions). However, if any side effects (such as artifacts or inaccurate behavior ofStencilPush) occur, it is advisable to re-enable the clearing instructions withclear_stencil=True.Added in version 2.3.0.
- class kivy.graphics.StencilUnUse
Bases:
InstructionUse current stencil buffer to unset the mask.
- class kivy.graphics.StencilUse(**kwargs)
Bases:
Instructionmore information.
- func_op
Determine the stencil operation to use for glStencilFunc(). Can be one of ‘never’, ‘less’, ‘equal’, ‘lequal’, ‘greater’, ‘notequal’, ‘gequal’ or ‘always’.
By default, the operator is set to ‘equal’.
Added in version 1.5.0.
- class kivy.graphics.Translate(*args, **kwargs)
Bases:
TransformConstruct by either:
Translate(x, y)         # translate in just the two axes
Translate(x, y, z)      # translate in all three axes
Changed in version 2.3.0: Allowed kwargs to be used to supply x, y and z.
- x
Property for getting/setting the translation on the X axis.
- xy
2 tuple with translation vector in 2D for x and y axis.
- xyz
3 tuple translation vector in 3D in x, y, and z axis.
- y
Property for getting/setting the translation on the Y axis.
- z
Property for getting/setting the translation on the Z axis.
- class kivy.graphics.Triangle(**kwargs)
Bases:
VertexInstruction- Parameters:
- points: list
List of points in the format (x1, y1, x2, y2, x3, y3).
- points
Property for getting/settings points of the triangle.
- class kivy.graphics.UpdateNormalMatrix
Bases:
ContextInstructionUpdate the normal matrix ‘normal_mat’ based on the current modelview matrix. This will compute ‘normal_mat’ uniform as: inverse( transpose( mat3(mvm) ) )
Added in version 1.6.0.
- class kivy.graphics.VertexInstruction(**kwargs)
Bases:
Instructionthat have a direct visual representation on the canvas, such as Rectangles, Triangles, Lines, Ellipse and so on.
- source
This property represents the filename to load the texture from. If you want to use an image as source, do it like this:
with self.canvas:
    Rectangle(source='mylogo.png', pos=self.pos, size=self.size)
Here’s the equivalent in Kivy language:
<MyWidget>:
    canvas:
        Rectangle:
            source: 'mylogo.png'
            pos: self.pos
            size: self.size
Note
The filename will be searched for using the
kivy.resources.resource_find()function.
- tex_coords
This property represents the texture coordinates used for drawing the vertex instruction. The value must be a list of 8 values.
A texture coordinate has a position (u, v), and a size (w, h). The size can be negative, and would represent the ‘flipped’ texture. By default, the tex_coords are:
[u, v, u + w, v, u + w, v + h, u, v + h]
You can pass your own texture coordinates if you want to achieve fancy effects.
Warning
The default values just mentioned can be negative. Depending on the image and label providers, the coordinates are flipped vertically because of the order in which the image is internally stored. Instead of flipping the image data, we are just flipping the texture coordinates to be faster.
- texture
Property that represents the texture used for drawing this Instruction. You can set a new texture like this:
from kivy.core.image import Image

texture = Image('logo.png').texture
with self.canvas:
    Rectangle(texture=texture, pos=self.pos, size=self.size)
Usually, you will use the
sourceattribute instead of the texture.
- kivy.graphics.gl_init_resources()
- BoxShadow
- Canvas
- CGL: standard C interface for OpenGL
- Context instructions
- Context management
- Framebuffer
- GL instructions
- Graphics compiler
- OpenGL
glActiveTexture()glAttachShader()glBindAttribLocation()glBindBuffer()glBindFramebuffer()glBindRenderbuffer()glBindTexture()glBlendColor()glBlendEquation()glBlendEquationSeparate()glBlendFunc()glBlendFuncSeparate()glBufferData()glBufferSubData()glCheckFramebufferStatus()glClear()glClearColor()glClearStencil()glColorMask()glCompileShader()glCompressedTexImage2D()glCompressedTexSubImage2D()glCopyTexImage2D()glCopyTexSubImage2D()glCreateProgram()glCreateShader()glCullFace()glDeleteBuffers()glDeleteFramebuffers()glDeleteProgram()glDeleteRenderbuffers()glDeleteShader()glDeleteTextures()glDepthFunc()glDepthMask()glDetachShader()glDisable()glDisableVertexAttribArray()glDrawArrays()glDrawElements()glEnable()glEnableVertexAttribArray()glFinish()glFlush()glFramebufferRenderbuffer()glFramebufferTexture2D()glFrontFace()glGenBuffers()glGenFramebuffers()glGenRenderbuffers()glGenTextures()glGenerateMipmap()glGetActiveAttrib()glGetActiveUniform()glGetAttachedShaders()glGetAttribLocation()glGetBooleanv()glGetBufferParameteriv()glGetError()glGetFloatv()glGetFramebufferAttachmentParameteriv()glGetIntegerv()glGetProgramInfoLog()glGetProgramiv()glGetRenderbufferParameteriv()glGetShaderInfoLog()glGetShaderPrecisionFormat()glGetShaderSource()glGetShaderiv()glGetString()glGetTexParameterfv()glGetTexParameteriv()glGetUniformLocation()glGetUniformfv()glGetUniformiv()glGetVertexAttribPointerv()glGetVertexAttribfv()glGetVertexAttribiv()glHint()glIsBuffer()glIsEnabled()glIsFramebuffer()glIsProgram()glIsRenderbuffer()glIsShader()glIsTexture()glLineWidth()glLinkProgram()glPixelStorei()glPolygonOffset()glReadPixels()glReadPixels_inplace()glReleaseShaderCompiler()glRenderbufferStorage()glSampleCoverage()glScissor()glShaderBinary()glShaderSource()glStencilFunc()glStencilFuncSeparate()glStencilMask()glStencilMaskSeparate()glStencilOp()glStencilOpSeparate()glTexImage2D()glTexParameterf()glTexParameterfv()glTexParameteri()glTexParameteriv()glTexSubImage2D()glUniform1f()glUniform1fv()glUniform1i()glUniform1iv()glUniform2f()glUniform2fv()glUniform2i()glUniform2iv()glUniform3f()glUniform3fv()glUniform3i()glUniform3iv()glUniform4f()glUniform4fv()glUniform4i()glUniform4iv()glUniformMatrix2fv()glUniformMatrix3fv()glUniformMatrix4fv()glUseProgram()glValidateProgram()glVertexAttrib1f()glVertexAttrib1fv()glVertexAttrib2f()glVertexAttrib2fv()glVertexAttrib3f()glVertexAttrib3fv()glVertexAttrib4f()glVertexAttrib4fv()glVertexAttribPointer()glViewport()gl_init_symbols()
- OpenGL utilities
- Scissor Instructions
- Shader
- Stencil instructions
- Tesselator
- Texture
- Blitting custom data
- BGR/BGRA support
- NPOT texture
- Texture atlas
- Mipmapping
- Reloading the Texture
TextureTexture.add_reload_observer()Texture.ask_update()Texture.bind()Texture.blit_buffer()Texture.blit_data()Texture.bufferfmtTexture.colorfmtTexture.create()Texture.create_from_data()Texture.flip_horizontal()Texture.flip_vertical()Texture.get_region()Texture.have_gles_limits()Texture.heightTexture.idTexture.mag_filterTexture.min_filterTexture.mipmapTexture.pixelsTexture.remove_reload_observer()Texture.save()Texture.sizeTexture.targetTexture.tex_coordsTexture.uvposTexture.uvsizeTexture.widthTexture.wrap
TextureRegion
- Transformation
- Vertex Instructions