Table Of Contents
A Simple Paint App
In the following tutorial, you will be guided through the creation of your first widget. This provides powerful and important knowledge when programming Kivy applications, as it lets you create completely new user interfaces with custom elements for your specific purpose.
Basic Considerations
When creating an application, you have to ask yourself three important questions:
What data does my application process?
How do I visually represent that data?
How does the user interact with that data?
If you want to write a very simple line drawing application for example, you most likely want the user to just draw on the screen with his/her fingers. That’s how the user interacts with your application. While doing so, your application would memorize the positions where the user’s finger were, so that you can later draw lines between those positions. So the points where the fingers were would be your data and the lines that you draw between them would be your visual representation.
In Kivy, an application’s user interface is composed of Widgets. Everything that you see on the screen is somehow drawn by a widget. Often you would like to be able to reuse code that you already wrote in a different context, which is why widgets typically represent one specific instance that answers the three questions above. A widget encapsulates data, defines the user’s interaction with that data and draws its visual representation. You can build anything from simple to complex user interfaces by nesting widgets. There are many widgets built in, such as buttons, sliders and other common stuff. In many cases, however, you need a custom widget that is beyond the scope of what is shipped with Kivy (e.g. a medical visualization widget).
So keep these three questions in mind when you design your widgets. Try to write them in a minimal and reusable manner (i.e. a widget does exactly what its supposed to do and nothing more. If you need more, write more widgets or compose other widgets of smaller widgets. We try to adhere to the Single Responsibility Principle).
Paint Widget
We’re sure one of your childhood dreams has always been creating your own multitouch paint program. Allow us to help you achieve that. In the following sections you will successively learn how to write a program like that using Kivy. Make sure that you have read and understood Create an application. You have? Great! Let’s get started!
Initial Structure
Let’s start by writing the very basic code structure that we need. By the way,
all the different pieces of code that are used in this section are also
available in the examples/guide/firstwidget directory that comes with Kivy,
so you don’t need to copy & paste it all the time.
Here is the basic code skeleton that we will need:
 1from kivy.app import App
 2from kivy.uix.widget import Widget
 3
 4
 5class MyPaintWidget(Widget):
 6    pass
 7
 8
 9class MyPaintApp(App):
10    def build(self):
11        return MyPaintWidget()
12
13
14if __name__ == '__main__':
15    MyPaintApp().run()
This is actually really simple. Save it as paint.py.
If you run it, you should only see a black screen.
As you can see, instead of using a built-in widget such as a Button (see
Create an application), we are going to write our own widget to do the drawing.
We do that by creating a class that inherits from
Widget (line 5-6) and although that class does nothing
yet, we can still treat it like a normal Kivy widget (line 11).
The if __name__ ... construct (line 14) is a Python mechanism that prevents
you from executing the code in the if-statement when importing from the file,
i.e. if you write import paint, it won’t do something unexpected but
just nicely provide the classes defined in the file.
Note
You may be wondering why you have to import App and Widget separately,
instead of doing something like from kivy import *. While shorter,
this would have the disadvantage of polluting your namespace
and make the start of the application potentially much slower.
It can also introduce ambiguity into class and variable naming,
so is generally frowned upon in the Python community. The way we do it is
faster and cleaner.
Adding Behaviour
Let’s now add some actual behaviour to the widget, i.e. make it react to user input. Change the code like so:
 1from kivy.app import App
 2from kivy.uix.widget import Widget
 3
 4
 5class MyPaintWidget(Widget):
 6    def on_touch_down(self, touch):
 7        print(touch)
 8
 9
10class MyPaintApp(App):
11    def build(self):
12        return MyPaintWidget()
13
14
15if __name__ == '__main__':
16    MyPaintApp().run()
This is just to show how easy it is to react to user input. When a
MotionEvent (i.e. a touch, click, etc.) occurs,
we simply print the information about the touch object to the console.
You won’t see anything on the screen, but if you observe the command-line from
which you are running the program, you will see a message for every touch.
This also demonstrates that a widget does not have to
have a visual representation.
Now that’s not really an overwhelming user experience. Let’s add some code that actually draws something into our window:
 1from kivy.app import App
 2from kivy.uix.widget import Widget
 3from kivy.graphics import Color, Ellipse
 4
 5
 6class MyPaintWidget(Widget):
 7
 8    def on_touch_down(self, touch):
 9        with self.canvas:
10            Color(1, 1, 0)
11            d = 30.
12            Ellipse(pos=(touch.x - d / 2, touch.y - d / 2), size=(d, d))
13
14
15class MyPaintApp(App):
16
17    def build(self):
18        return MyPaintWidget()
19
20
21if __name__ == '__main__':
22    MyPaintApp().run()
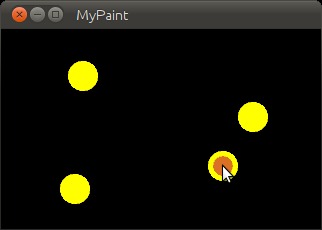
If you run your code with these modifications, you will see that every time you touch, there will be a small yellow circle drawn where you touched. How does it work?
Line 9: We use Python’s
withstatement with the widget’sCanvasobject. This is like an area in which the widget can draw things to represent itself on the screen. By using thewithstatement with it, all successive drawing commands that are properly indented will modify this canvas. Thewithstatement also makes sure that after our drawing, internal state can be cleaned up properly.Line 10: You might have guessed it already: This sets the
Colorfor successive drawing operations to yellow (default color format is RGB, so (1, 1, 0) is yellow). This is true until anotherColoris set. Think of this as dipping your brushes in that color, which you can then use to draw on a canvas until you dip the brushes into another color.Line 11: We specify the diameter for the circle that we are about to draw. Using a variable for that is preferable since we need to refer to that value multiple times and we don’t want to have to change it in several places if we want the circle bigger or smaller.
Line 12: To draw a circle, we simply draw an
Ellipsewith equal width and height. Since we want the circle to be drawn where the user touches, we pass the touch’s position to the ellipse. Note that we need to shift the ellipse by-d/2in the x and y directions (i.e. left and downwards) because the position specifies the bottom left corner of the ellipse’s bounding box, and we want it to be centered around our touch.
That was easy, wasn’t it? It gets better! Update the code to look like this:
 1from kivy.app import App
 2from kivy.uix.widget import Widget
 3from kivy.graphics import Color, Ellipse, Line
 4
 5
 6class MyPaintWidget(Widget):
 7
 8    def on_touch_down(self, touch):
 9        with self.canvas:
10            Color(1, 1, 0)
11            d = 30.
12            Ellipse(pos=(touch.x - d / 2, touch.y - d / 2), size=(d, d))
13            touch.ud['line'] = Line(points=(touch.x, touch.y))
14
15    def on_touch_move(self, touch):
16        touch.ud['line'].points += [touch.x, touch.y]
17
18
19class MyPaintApp(App):
20
21    def build(self):
22        return MyPaintWidget()
23
24
25if __name__ == '__main__':
26    MyPaintApp().run()
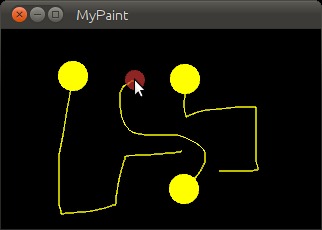
- This is what has changed:
Line 3: We now not only import the
Ellipsedrawing instruction, but also theLinedrawing instruction. If you look at the documentation forLine, you will see that it accepts apointsargument that has to be a list of 2D point coordinates, like(x1, y1, x2, y2, ..., xN, yN).Line 13: This is where it gets interesting.
touch.udis a Python dictionary (type <dict>) that allows us to store custom attributes for a touch.Line 13: We make use of the Line instruction that we imported and set a Line up for drawing. Since this is done in
on_touch_down, there will be a new line for every new touch. By creating the line inside thewithblock, the canvas automatically knows about the line and will draw it. We just want to modify the line later, so we store a reference to it in thetouch.uddictionary under the arbitrarily chosen but aptly named key ‘line’. We pass the line that we’re creating the initial touch position because that’s where our line will begin.Lines 15: We add a new method to our widget. This is similar to the
on_touch_downmethod, but instead of being called when a new touch occurs, this method is being called when an existing touch (for whichon_touch_downwas already called) moves, i.e. its position changes. Note that this is the sameMotionEventobject with updated attributes. This is something we found incredibly handy and you will shortly see why.Line 16: Remember: This is the same touch object that we got in
on_touch_down, so we can simply access the data we stored away in thetouch.uddictionary! To the line we set up for this touch earlier, we now add the current position of the touch as a new point. We know that we need to extend the line because this happens inon_touch_move, which is only called when the touch has moved, which is exactly why we want to update the line. Storing the line in thetouch.udmakes it a whole lot easier for us as we don’t have to maintain our own touch-to-line bookkeeping.
So far so good. This isn’t exactly beautiful yet, though. It looks a bit like spaghetti bolognese. How about giving each touch its own color? Great, let’s do it:
 1from random import random
 2from kivy.app import App
 3from kivy.uix.widget import Widget
 4from kivy.graphics import Color, Ellipse, Line
 5
 6
 7class MyPaintWidget(Widget):
 8
 9    def on_touch_down(self, touch):
10        color = (random(), random(), random())
11        with self.canvas:
12            Color(*color)
13            d = 30.
14            Ellipse(pos=(touch.x - d / 2, touch.y - d / 2), size=(d, d))
15            touch.ud['line'] = Line(points=(touch.x, touch.y))
16
17    def on_touch_move(self, touch):
18        touch.ud['line'].points += [touch.x, touch.y]
19
20
21class MyPaintApp(App):
22
23    def build(self):
24        return MyPaintWidget()
25
26
27if __name__ == '__main__':
28    MyPaintApp().run()
Here are the changes:
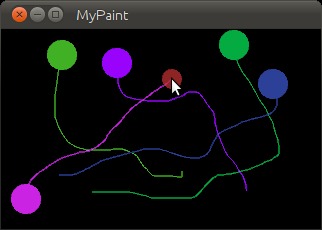
Line 1: We import Python’s random() function that will give us random values in the range of [0., 1.).
Line 10: In this case we simply create a new tuple of 3 random float values that will represent a random RGB color. Since we do this in
on_touch_down, every new touch will get its own color. Don’t get confused by the use of tuples. We’re just binding the tuple tocolorfor use as a shortcut within this method because we’re lazy.Line 12: As before, we set the color for the canvas. Only this time we use the random values we generated and feed them to the color class using Python’s tuple unpacking syntax (since the Color class expects three individual color components instead of just 1. If we were to pass the tuple directly, that would be just 1 value being passed, regardless of the fact that the tuple itself contains 3 values).
This looks a lot nicer already! With a lot of skill and patience, you might even be able to create a nice little drawing!
Note
Since by default the Color
instructions assume RGB mode and we’re feeding a tuple with three
random float values to it, it might very well happen that we end up
with a lot of dark or even black colors if we are unlucky. That would
be bad because by default the background color is dark as well, so you
wouldn’t be able to (easily) see the lines you draw.
There is a nice trick to prevent this: Instead of creating a tuple with
three random values, create a tuple like this: (random(), 1., 1.).
Then, when passing it to the color instruction, set the mode to HSV
color space: Color(*color, mode='hsv'). This way you will have a
smaller number of possible colors, but the colors that you get will
always be equally bright: only the hue changes.
Bonus Points
At this point, we could say we are done. The widget does what it’s supposed to do: it traces the touches and draws lines. It even draws circles at the positions where a line begins.
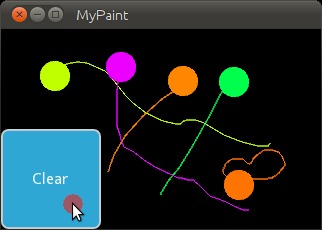
But what if the user wants to start a new drawing? With the current code, the only way to clear the window would be to restart the entire application. Luckily, we can do better. Let us add a Clear button that erases all the lines and circles that have been drawn so far. There are two options now:
We could either create the button as a child of our widget. That would imply that if you create more than one widget, every widget gets its own button. If you’re not careful, this will also allow users to draw on top of the button, which might not be what you want.
Or we set up the button only once, initially, in our app class and when it’s pressed we clear the widget.
For our simple example, it doesn’t really matter that much. For larger
applications you should give some thought to who does what in your app.
We’ll go with the second option here so that you see how you can build up
your application’s widget tree in your app class’s build()
method. We’ll also change to the HSV color space (see preceding note):
 1from random import random
 2from kivy.app import App
 3from kivy.uix.widget import Widget
 4from kivy.uix.button import Button
 5from kivy.graphics import Color, Ellipse, Line
 6
 7
 8class MyPaintWidget(Widget):
 9
10    def on_touch_down(self, touch):
11        color = (random(), 1, 1)
12        with self.canvas:
13            Color(*color, mode='hsv')
14            d = 30.
15            Ellipse(pos=(touch.x - d / 2, touch.y - d / 2), size=(d, d))
16            touch.ud['line'] = Line(points=(touch.x, touch.y))
17
18    def on_touch_move(self, touch):
19        touch.ud['line'].points += [touch.x, touch.y]
20
21
22class MyPaintApp(App):
23
24    def build(self):
25        parent = Widget()
26        self.painter = MyPaintWidget()
27        clearbtn = Button(text='Clear')
28        clearbtn.bind(on_release=self.clear_canvas)
29        parent.add_widget(self.painter)
30        parent.add_widget(clearbtn)
31        return parent
32
33    def clear_canvas(self, obj):
34        self.painter.canvas.clear()
35
36
37if __name__ == '__main__':
38    MyPaintApp().run()
Here’s what happens:
Line 4: We added an import statement to be able to use the
Buttonclass.Line 25: We create a dummy
Widget()object as a parent for both our painting widget and the button we’re about to add. This is just a poor-man’s approach to setting up a widget tree hierarchy. We could just as well use a layout or do some other fancy stuff. Again: this widget does absolutely nothing except holding the two widgets we will now add to it as children.Line 26: We create our
MyPaintWidget()as usual, only this time we don’t return it directly but bind it to a variable name.Line 27: We create a button widget. It will have a label on it that displays the text ‘Clear’.
Line 28: We then bind the button’s on_release event (which is fired when the button is pressed and then released) to the callback function clear_canvas defined on below on Lines 33 & 34.
Line 29 & 30: We set up the widget hierarchy by making both the painter and the clearbtn children of the dummy parent widget. That means painter and clearbtn are now siblings in the usual computer science tree terminology.
Line 33 & 34: Up to now, the button did nothing. It was there, visible, and you could press it, but nothing would happen. We change that here: we create a small, throw-away function that is going to be our callback function when the button is pressed. The function just clears the painter’s canvas’ contents, making it black again.
Note
The Kivy Widget class, by design, is kept simple. There are no general properties such as background color and border color. Instead, the examples and documentation illustrate how to easily handle such simple things yourself, as we have done here, setting the color for the canvas, and drawing the shape. From a simple start, you can move to more elaborate customization. Higher-level built-in widgets, deriving from Widget, such as Button, do have convenience properties such as background_color, but these vary by widget. Use the API docs to see what is offered by a widget, and subclass if you need to add more functionality.
Congratulations! You’ve written your first Kivy widget. Obviously this was just a quick introduction. There is much more to discover. We suggest taking a short break to let what you just learned sink in. Maybe draw some nice pictures to relax? If you feel like you’ve understood everything and are ready for more, we encourage you to read on.