Table Of Contents
Pong Game Tutorial
Introduction
Welcome to the Pong tutorial
This tutorial will teach you how to write pong using Kivy. We’ll start with a basic application like the one described in the Create an application and turn it into a playable pong game, describing each step along the way.
Here is a check list before starting this tutorial:
You have a working Kivy installation. See the Installing Kivy section for detailed descriptions
You know how to run a basic Kivy application. See Create an application if you don’t.
If you have read the programming guide, and understand both basic Widget concepts (A Simple Paint App) and basic concepts of the kv language (Kv language), you can probably skip the first 2 steps and go straight to step 3.
Note
You can find the entire source code–and source code files for each step–in the Kivy examples directory under tutorials/pong/.
Ready? Sweet, let’s get started!
Getting Started
Getting Started
Let’s start by getting a really simple Kivy app up and running. Create a directory for the game and a file named main.py
 1from kivy.app import App
 2from kivy.uix.widget import Widget
 3
 4
 5class PongGame(Widget):
 6    pass
 7
 8
 9class PongApp(App):
10    def build(self):
11        return PongGame()
12
13
14if __name__ == '__main__':
15    PongApp().run()
Go ahead and run the application. It should just show a black window at this
point. What we’ve done is create a very simple Kivy App,
which creates an instance of our PongGame Widget class and returns it as
the root element for the applications UI, which you should imagine at this
point as a hierarchical tree of Widgets. Kivy places this widget-tree in the
default Window. In the next step, we will draw the
Pong background and scores by defining how the PongGame widget looks.
Add Simple Graphics
Creation of pong.kv
We will use a .kv file to define the look and feel of the PongGame class.
Since our App class is called PongApp, we can simply create a file
called pong.kv in the same directory that will be automatically loaded
when the application is run. So create a new file called ``pong.kv`` and add
the following contents.
 1#:kivy 1.0.9
 2
 3<PongGame>:
 4    canvas:
 5        Rectangle:
 6            pos: self.center_x - 5, 0
 7            size: 10, self.height
 8
 9    Label:
10        font_size: 70
11        center_x: root.width / 4
12        top: root.top - 50
13        text: "0"
14
15    Label:
16        font_size: 70
17        center_x: root.width * 3 / 4
18        top: root.top - 50
19        text: "0"
Note
COMMON ERROR: The name of the kv file, e.g. pong.kv, must match the name of the app, e.g. PongApp (the part before the App ending).
If you run the app now, you should see a vertical bar in the middle, and two zeros where the player scores will be displayed.
Explaining the Kv File Syntax
Before going on to the next step, you might want to take a closer look at the contents of the kv file we just created and figure out what is going on. If you understand what’s happening, you can probably skip ahead to the next step.
On the very first line we have:
#:kivy 1.0.9
This first line is required in every kv file. It should start with #:kivy
followed by a space and the Kivy version it is intended for (so Kivy can make
sure you have at least the required version, or handle backwards compatibility
later on).
After that, we begin defining rules that are applied to all PongGame
instances:
<PongGame>:
    ...
Like Python, kv files use indentation to define nested blocks. A block defined
with a class name inside the < and > characters is a
Widget rule. It will be applied to any instance of
the named class. If you replaced PongGame with Widget in our example, all
Widget instances would have the vertical line and the two Label widgets inside
them because it would define these rules for all Widget instances.
Inside a rule section, you can add various blocks to define the style and contents of the widgets they will be applied to. You can:
set property values
add child widgets
define a canvas section in which you can add Graphics instructions that define how the widget is rendered.
The first block inside the <PongGame> rule we have is a canvas block:
1<PongGame>:
2    canvas:
3        Rectangle:
4            pos: self.center_x - 5, 0
5            size: 10, self.height
So this canvas block says that the PongGame widget should draw some
graphics primitives. In this case, we add a rectangle to the canvas. We set
the pos of the rectangle to be 5 pixels left of the horizontal center of
the widget, and 0 for y. The size of the rectangle is set to 10 pixels
in width, and the widget’s height in height. The nice thing about defining the
graphics like this, is that the rendered rectangle will be automatically
updated when the properties of any widgets used in the value expression change.
Note
Try to resize the application window and notice what happens. That’s
right, the entire UI resizes automatically. The standard behaviour of the
Window is to resize an element based on its property size_hint. The
default widget size_hint is (1,1), meaning it will be stretched 100% in both
x-direction and y-direction and hence fill the available space.
Since the pos and size of the rectangle and center_x and top of the score
labels were defined within
the context of the PongGame class, these properties will automatically
update when the corresponding widget properties change. Using the Kv
language gives you automatic property binding. :)
The last two sections we add look pretty similar. Each of them adds a Label
widget as a child widget to the PongGame widget. For now, the text on
both of them is just set to “0”. We’ll hook that up to the actual
score once we have the logic implemented, but the labels already
look good since we set a bigger font_size, and positioned them relatively
to the root widget. The root keyword can be used inside the child block to
refer back to the parent/root widget the rule applies to (PongGame in this
case):
 1<PongGame>:
 2    # ...
 3
 4    Label:
 5        font_size: 70
 6        center_x: root.width / 4
 7        top: root.top - 50
 8        text: "0"
 9
10    Label:
11        font_size: 70
12        center_x: root.width * 3 / 4
13        top: root.top - 50
14        text: "0"
Add the Ball
Add the Ball
Ok, so we have a basic pong arena to play in, but we still need the players and a ball to hit around. Let’s start with the ball. We’ll add a new PongBall class to create a widget that will be our ball and make it bounce around.
PongBall Class
Here is the Python code for the PongBall class:
 1class PongBall(Widget):
 2
 3    # velocity of the ball on x and y axis
 4    velocity_x = NumericProperty(0)
 5    velocity_y = NumericProperty(0)
 6
 7    # referencelist property so we can use ball.velocity as
 8    # a shorthand, just like e.g. w.pos for w.x and w.y
 9    velocity = ReferenceListProperty(velocity_x, velocity_y)
10
11    # ``move`` function will move the ball one step. This
12    #  will be called in equal intervals to animate the ball
13    def move(self):
14        self.pos = Vector(*self.velocity) + self.pos
And here is the kv rule used to draw the ball as a white circle:
1<PongBall>:
2    size: 50, 50
3    canvas:
4        Ellipse:
5            pos: self.pos
6            size: self.size
To make it all work, you also have to add the imports for the
Properties Property classes used and the
Vector.
Here is the entire updated python code and kv file for this step:
- main.py:
 1from kivy.app import App
 2from kivy.uix.widget import Widget
 3from kivy.properties import NumericProperty, ReferenceListProperty
 4from kivy.vector import Vector
 5
 6
 7class PongBall(Widget):
 8    velocity_x = NumericProperty(0)
 9    velocity_y = NumericProperty(0)
10    velocity = ReferenceListProperty(velocity_x, velocity_y)
11
12    def move(self):
13        self.pos = Vector(*self.velocity) + self.pos
14
15
16class PongGame(Widget):
17    pass
18
19
20class PongApp(App):
21    def build(self):
22        return PongGame()
23
24
25if __name__ == '__main__':
26    PongApp().run()
- pong.kv:
 1#:kivy 1.0.9
 2
 3<PongBall>:
 4    size: 50, 50
 5    canvas:
 6        Ellipse:
 7            pos: self.pos
 8            size: self.size
 9
10<PongGame>:
11    canvas:
12        Rectangle:
13            pos: self.center_x - 5, 0
14            size: 10, self.height
15
16    Label:
17        font_size: 70
18        center_x: root.width / 4
19        top: root.top - 50
20        text: "0"
21
22    Label:
23        font_size: 70
24        center_x: root.width * 3 / 4
25        top: root.top - 50
26        text: "0"
27
28    PongBall:
29        center: self.parent.center
30
Note that not only a <PongBall> widget rule has been added, but also a child widget PongBall in the <PongGame> widget rule.
Adding Ball Animation
Making the ball move
Cool, so now we have a ball, and it even has a move function… but it’s not
moving yet. Let’s fix that.
Scheduling Functions on the Clock
We need the move method of our ball to be called regularly. Luckily, Kivy
makes this pretty easy by letting us schedule any function we want using the
Clock and specifying the interval:
Clock.schedule_interval(game.update, 1.0/60.0)
This line for example, would cause the update function of the game object to
be called once every 60th of a second (60 times per second).
Object Properties/References
We have another problem though. We’d like to make sure the PongBall has its
move function called regularly, but in our code we don’t have any references
to the ball object since we just added it via the kv file
inside the kv rule for the PongGame class. The only reference to our
game is the one we return in the applications build method.
Since we’re going to have to do more than just move the ball (e.g.
bounce it off the walls and later the players racket), we’ll probably need
an update method for our PongGame class anyway. Furthermore, given that
we have a reference to the game object already, we can easily schedule its new
update method when the application gets built:
 1class PongGame(Widget):
 2
 3    def update(self, dt):
 4        # call ball.move and other stuff
 5        pass
 6
 7class PongApp(App):
 8
 9    def build(self):
10        game = PongGame()
11        Clock.schedule_interval(game.update, 1.0/60.0)
12        return game
However, that still doesn’t change the fact that we don’t have a reference to the
PongBall child widget created by the kv rule. To fix this, we can add an
ObjectProperty
to the PongGame class, and hook it up to the widget created in
the kv rule. Once that’s done, we can easily reference the ball property
inside the update method and even make it bounce off the edges:
 1class PongGame(Widget):
 2    ball = ObjectProperty(None)
 3
 4    def update(self, dt):
 5        self.ball.move()
 6
 7        # bounce off top and bottom
 8        if (self.ball.y < 0) or (self.ball.top > self.height):
 9            self.ball.velocity_y *= -1
10
11        # bounce off left and right
12        if (self.ball.x < 0) or (self.ball.right > self.width):
13            self.ball.velocity_x *= -1
Don’t forget to hook it up in the kv file, by giving the child widget an id
and setting the PongGame’s ball ObjectProperty to that id:
1<PongGame>:
2    ball: pong_ball
3
4    # ... (canvas and Labels)
5
6    PongBall:
7        id: pong_ball
8        center: self.parent.center
Note
At this point everything is hooked up for the ball to bounce around. If
you’re coding along as we go, you might be wondering why the ball isn’t
moving anywhere. The ball’s velocity is set to 0 on both x and y.
In the code listing below, a serve_ball method is
added to the PongGame class and called in the app’s build method. It sets a
random x and y velocity for the ball, and also resets the position, so we
can use it later to reset the ball when a player has scored a point.
Here is the entire code for this step:
- main.py:
 1from kivy.app import App
 2from kivy.uix.widget import Widget
 3from kivy.properties import (
 4    NumericProperty, ReferenceListProperty, ObjectProperty
 5)
 6from kivy.vector import Vector
 7from kivy.clock import Clock
 8from random import randint
 9
10
11class PongBall(Widget):
12    velocity_x = NumericProperty(0)
13    velocity_y = NumericProperty(0)
14    velocity = ReferenceListProperty(velocity_x, velocity_y)
15
16    def move(self):
17        self.pos = Vector(*self.velocity) + self.pos
18
19
20class PongGame(Widget):
21    ball = ObjectProperty(None)
22
23    def serve_ball(self):
24        self.ball.center = self.center
25        self.ball.velocity = Vector(4, 0).rotate(randint(0, 360))
26
27    def update(self, dt):
28        self.ball.move()
29
30        # bounce off top and bottom
31        if (self.ball.y < 0) or (self.ball.top > self.height):
32            self.ball.velocity_y *= -1
33
34        # bounce off left and right
35        if (self.ball.x < 0) or (self.ball.right > self.width):
36            self.ball.velocity_x *= -1
37
38
39class PongApp(App):
40    def build(self):
41        game = PongGame()
42        game.serve_ball()
43        Clock.schedule_interval(game.update, 1.0 / 60.0)
44        return game
45
46
47if __name__ == '__main__':
48    PongApp().run()
- pong.kv:
 1#:kivy 1.0.9
 2
 3<PongBall>:
 4    size: 50, 50
 5    canvas:
 6        Ellipse:
 7            pos: self.pos
 8            size: self.size
 9
10<PongGame>:
11    ball: pong_ball
12
13    canvas:
14        Rectangle:
15            pos: self.center_x - 5, 0
16            size: 10, self.height
17
18    Label:
19        font_size: 70
20        center_x: root.width / 4
21        top: root.top - 50
22        text: "0"
23
24    Label:
25        font_size: 70
26        center_x: root.width * 3 / 4
27        top: root.top - 50
28        text: "0"
29
30    PongBall:
31        id: pong_ball
32        center: self.parent.center
33
Connect Input Events
Adding Players and reacting to touch input
Sweet, our ball is bouncing around. The only things missing now are the movable
player rackets and keeping track of the score. We won’t go over all the
details of creating the class and kv rules again, since those concepts were
already covered in the previous steps. Instead, let’s focus on how to move the
Player widgets in response to user input. You can get the whole code and kv
rules for the PongPaddle class at the end of this section.
In Kivy, a widget can react to input by implementing the
on_touch_down, the
on_touch_move and the
on_touch_up
methods. By default, the Widget class
implements these methods by just calling the corresponding method on all its
child widgets to pass on the event until one of the children returns True.
Pong is pretty simple. The rackets just need to move up and down. In fact it’s
so simple, we don’t even really need to have the player widgets handle the
events themselves. We’ll just implement the on_touch_move function for the
PongGame class and have it set the position of the left or right player based
on whether the touch occurred on the left or right side of the screen.
Check the on_touch_move handler:
1def on_touch_move(self, touch):
2    if touch.x < self.width/3:
3        self.player1.center_y = touch.y
4    if touch.x > self.width - self.width/3:
5        self.player2.center_y = touch.y
We’ll keep the score for each player in a
NumericProperty. The score labels of the PongGame
are kept updated by changing the NumericProperty score, which in turn
updates the PongGame child labels text property. This binding
occurs because Kivy properties automatically bind to any references
in their corresponding kv files. When the ball
escapes out of the sides, we’ll update the score and serve the ball
again by changing the update method in the PongGame class. The PongPaddle
class also implements a bounce_ball method, so that the ball bounces
differently based on where it hits the racket. Here is the code for the
PongPaddle class:
1class PongPaddle(Widget):
2
3    score = NumericProperty(0)
4
5    def bounce_ball(self, ball):
6        if self.collide_widget(ball):
7            speedup  = 1.1
8            offset = 0.02 * Vector(0, ball.center_y-self.center_y)
9            ball.velocity =  speedup * (offset - ball.velocity)
Note
This algorithm for ball bouncing is very simple, but will have strange behavior if the ball hits the paddle from the side or bottom…this is something you could try to fix yourself if you like.
And here it is in context. Pretty much done:
- main.py:
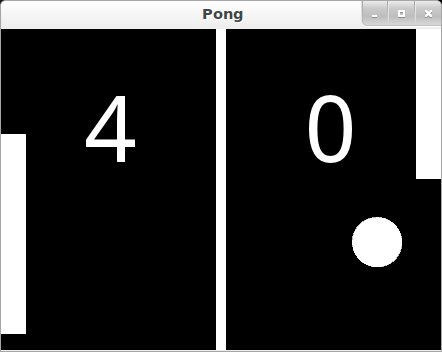
 1from kivy.app import App
 2from kivy.uix.widget import Widget
 3from kivy.properties import (
 4    NumericProperty, ReferenceListProperty, ObjectProperty
 5)
 6from kivy.vector import Vector
 7from kivy.clock import Clock
 8
 9
10class PongPaddle(Widget):
11    score = NumericProperty(0)
12
13    def bounce_ball(self, ball):
14        if self.collide_widget(ball):
15            vx, vy = ball.velocity
16            offset = (ball.center_y - self.center_y) / (self.height / 2)
17            bounced = Vector(-1 * vx, vy)
18            vel = bounced * 1.1
19            ball.velocity = vel.x, vel.y + offset
20
21
22class PongBall(Widget):
23    velocity_x = NumericProperty(0)
24    velocity_y = NumericProperty(0)
25    velocity = ReferenceListProperty(velocity_x, velocity_y)
26
27    def move(self):
28        self.pos = Vector(*self.velocity) + self.pos
29
30
31class PongGame(Widget):
32    ball = ObjectProperty(None)
33    player1 = ObjectProperty(None)
34    player2 = ObjectProperty(None)
35
36    def serve_ball(self, vel=(4, 0)):
37        self.ball.center = self.center
38        self.ball.velocity = vel
39
40    def update(self, dt):
41        self.ball.move()
42
43        # bounce off paddles
44        self.player1.bounce_ball(self.ball)
45        self.player2.bounce_ball(self.ball)
46
47        # bounce ball off bottom or top
48        if (self.ball.y < self.y) or (self.ball.top > self.top):
49            self.ball.velocity_y *= -1
50
51        # went off to a side to score point?
52        if self.ball.x < self.x:
53            self.player2.score += 1
54            self.serve_ball(vel=(4, 0))
55        if self.ball.right > self.width:
56            self.player1.score += 1
57            self.serve_ball(vel=(-4, 0))
58
59    def on_touch_move(self, touch):
60        if touch.x < self.width / 3:
61            self.player1.center_y = touch.y
62        if touch.x > self.width - self.width / 3:
63            self.player2.center_y = touch.y
64
65
66class PongApp(App):
67    def build(self):
68        game = PongGame()
69        game.serve_ball()
70        Clock.schedule_interval(game.update, 1.0 / 60.0)
71        return game
72
73
74if __name__ == '__main__':
75    PongApp().run()
pong.kv:
 1#:kivy 1.0.9
 2
 3<PongBall>:
 4    size: 50, 50
 5    canvas:
 6        Ellipse:
 7            pos: self.pos
 8            size: self.size
 9
10<PongPaddle>:
11    size: 25, 200
12    canvas:
13        Rectangle:
14            pos: self.pos
15            size: self.size
16
17<PongGame>:
18    ball: pong_ball
19    player1: player_left
20    player2: player_right
21
22    canvas:
23        Rectangle:
24            pos: self.center_x - 5, 0
25            size: 10, self.height
26
27    Label:
28        font_size: 70
29        center_x: root.width / 4
30        top: root.top - 50
31        text: str(root.player1.score)
32
33    Label:
34        font_size: 70
35        center_x: root.width * 3 / 4
36        top: root.top - 50
37        text: str(root.player2.score)
38
39    PongBall:
40        id: pong_ball
41        center: self.parent.center
42
43    PongPaddle:
44        id: player_left
45        x: root.x
46        center_y: root.center_y
47
48    PongPaddle:
49        id: player_right
50        x: root.width - self.width
51        center_y: root.center_y
52
Where To Go Now?
Have some fun
Well, the pong game is pretty much complete. If you understood all of the things that are covered in this tutorial, give yourself a pat on the back and think about how you could improve the game. Here are a few ideas of things you could do:
Add some nicer graphics / images. (Hint: check out the
sourceproperty on the graphics instructions likecircleorRectangle, to set an image as the texture.)Make the game end after a certain score. Maybe once a player has 10 points, you can display a large “PLAYER 1 WINS” label and/or add a main menu to start, pause and reset the game. (Hint: check out the
ButtonandLabelclasses, and figure out how to use their add_widget and remove_widget functions to add or remove widgets dynamically.)Make it a 4 player Pong Game. Most tablets have Multi-Touch support, so wouldn’t it be cool to have a player on each side and have four people play at the same time?
Fix the simplistic collision check so hitting the ball with an end of the paddle results in a more realistic bounce.
Note
You can find the entire source code–and source code files for each step–in the Kivy examples directory under tutorials/pong/.